

Delicious Cookie Monster Ice Cream Recipe: A Fun Twist on Classic Dessert
If you’re a fan of delightful desserts that capture both whimsy and flavor, the Cookie Monster Ice Cream Recipe is sure to become your new favorite treat. Inspired by one of the most beloved characters from “Sesame Street,” this ice cream embodies fun with its vibrant blue color, chunky cookie dough bits, and chocolate chips. Whether you’re entertaining guests at a party or simply treating yourself after a long day, this recipe delivers an experience worth savoring.
Introduction to Cookie Monster Ice Cream
The Cookie Monster, with his insatiable love for cookies, has brought joy and laughter to countless children and adults alike. His character is not just about indulging in sweets but also teaches lessons about sharing and friendship. The popularity of Cookie Monster has led to a variety of products inspired by him, including toys, clothing, and, of course, delicious desserts.
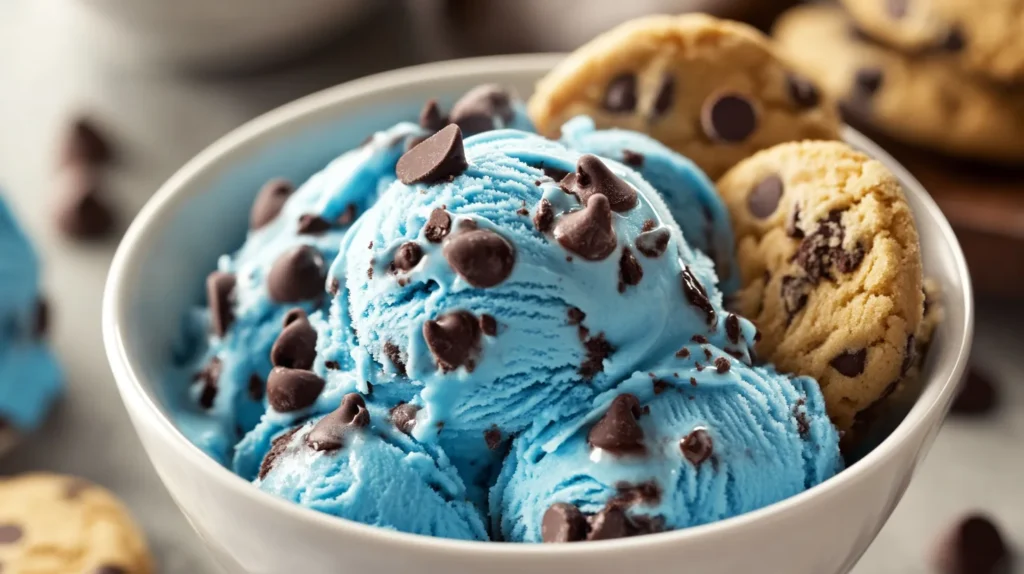
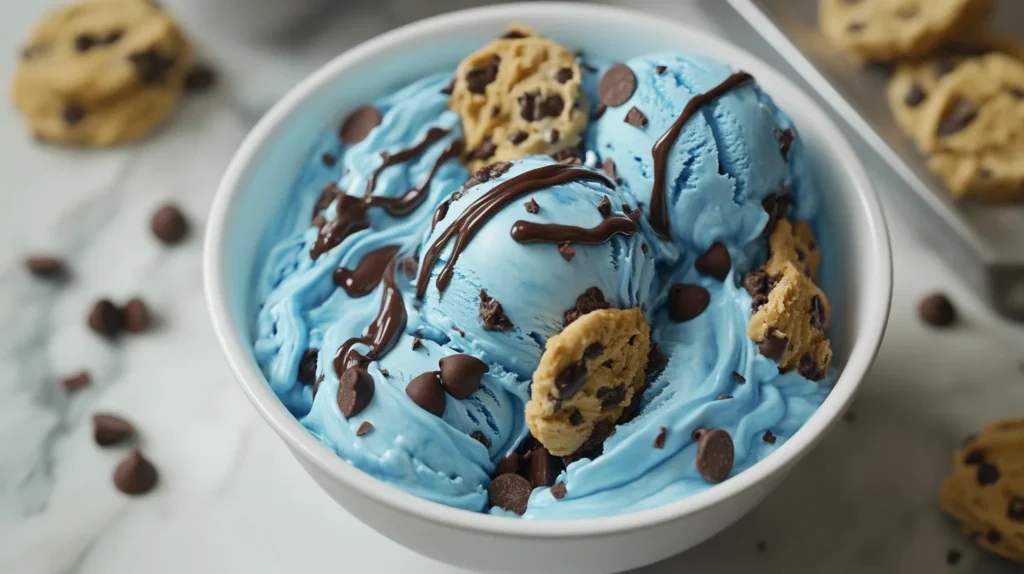
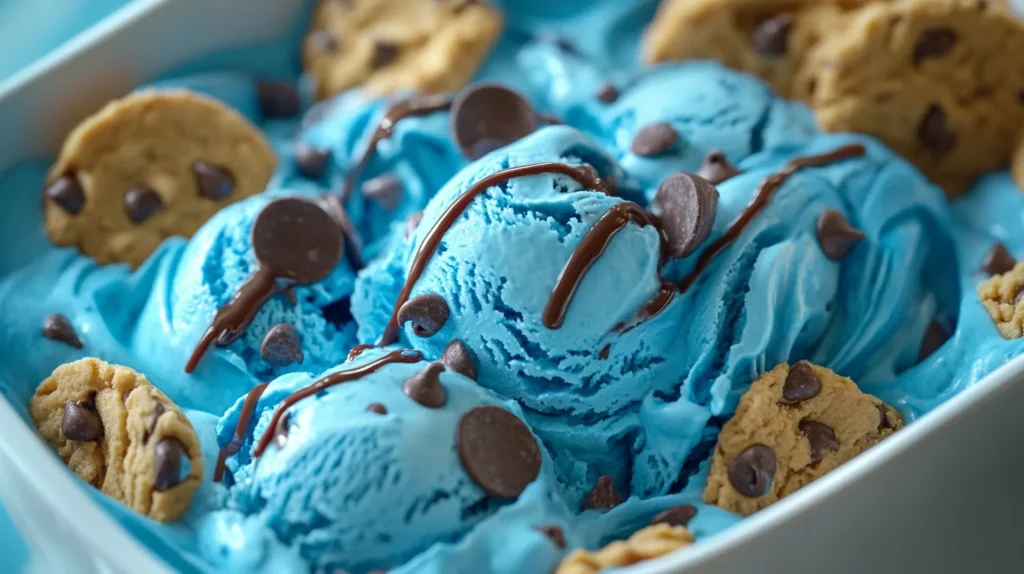
Cookie Monster Ice Cream is a whimsical blend that brings together creamy vanilla ice cream, blue food coloring, cookie dough chunks, and chocolate chip cookies. Its playful appearance and mouthwatering taste appeal to both children and adults, making it the perfect dessert for any occasion. This ice cream is more than just a treat; it’s a celebration of creativity, nostalgia, and, most importantly, the joy that comes from enjoying cookies.
The Appeal of Cookie Monster Ice Cream
The vibrant blue color of this ice cream instantly draws you in, evoking the cheerful spirit of the Cookie Monster himself. Each scoop is packed with crunchy cookie dough pieces and rich chocolate chips, creating a delightful contrast in texture. The aesthetic appeal combined with the nostalgic flavor profile brings delight to anyone who takes a bite.
Moreover, making this ice cream at home allows for customization—you can adjust the level of sweetness, add different mix-ins, or even experiment with flavors. It’s a versatile dessert that encourages creativity in the kitchen. Plus, it’s a fantastic conversation starter when served at gatherings, as everyone will want to know how to make this show-stopping treat!
Ingredients Needed
Creating the perfect Cookie Monster Ice Cream begins with gathering the right ingredients. Understanding what goes into your ice cream base and the delightful cookie dough mix-ins is crucial for achieving the best flavor and texture.
Essential Ingredients for the Ice Cream Base
To create a creamy and flavorful ice cream base, you’ll need simple yet essential ingredients:
- Heavy cream: This provides richness and creaminess to the ice cream. The higher fat content helps achieve a smooth texture.
- Whole milk: Balancing the heavy cream with whole milk creates a lighter base while still maintaining creaminess.
- Granulated sugar: Sweetness is key! Sugar enhances the flavors and contributes to the overall texture of the ice cream.
- Vanilla extract: Adding pure vanilla extract elevates the flavor profile of the ice cream, giving it a classic touch.
Specific Ingredients Needed for Cookie Dough Mix-Ins
No Cookie Monster Ice Cream is complete without its signature cookie dough pieces. Here’s what you’ll need:
- All-purpose flour: To create the cookie dough base.
- Brown sugar: This adds a rich, caramel-like flavor that pairs beautifully with the vanilla ice cream.
- Butter: Softened butter gives the dough a lovely richness and helps bind the ingredients together.
- Chocolate chips: These are a must for a chewy texture and indulgent flavor.
Optional Toppings and Suggestions for Serving
While the basic recipe is divine on its own, additional toppings can elevate your Cookie Monster Ice Cream experience even further:
- Crushed cookies: Add a sprinkle of crushed chocolate chip cookies on top for extra crunch.
- Whipped cream: A dollop of whipped cream makes for a delightful addition, adding lightness and sweetness.
- Sprinkles: Colorful sprinkles enhance the fun, making it visually appealing—especially for kids.
Equipment Required
Before diving into the preparation of your Cookie Monster Ice Cream, it’s important to gather the necessary tools. Having the right equipment on hand will ensure a smooth and enjoyable process.
Overview of Kitchen Tools and Equipment Needed
Creating homemade ice cream requires a few specific tools:
- Mixing bowls: You’ll need several sizes for combining ingredients and preparing your mixtures.
- Electric mixer: An electric mixer makes whipping the cream and blending the ingredients effortless.
- Spatula: A rubber spatula is ideal for folding ingredients and scraping down the sides of the mixing bowl.
Recommendations for Ice Cream Makers vs. No-Churn Method
For enthusiasts looking to invest in an ice cream maker, it can greatly simplify the process. Ice cream makers churn the mixture while freezing, helping to incorporate air, leading to a smoother texture.
Alternatively, if you don’t have an ice cream maker, the no-churn method is equally effective. Simply place the mixture in a freezer-safe container and stir every hour for the first few hours to break up ice crystals. This method is great for those who may want to skip the extra step.
Preparing the Ice Cream Base
Once you have gathered your ingredients and equipment, it’s time to prepare the ice cream base. Following these steps carefully ensures a creamy and delicious result.
Step-by-Step Guide on Making the Ice Cream Base
Begin by mixing the heavy cream, milk, granulated sugar, and vanilla extract in a large mixing bowl. Use an electric mixer to combine the ingredients until the sugar dissolves completely.
Next, remember to chill the mixture in the refrigerator for at least 30 minutes. Chilling the mixture before churning is a critical step—it helps the flavors develop and results in a creamier texture.
Tips for Achieving a Creamy Texture
Achieving that sought-after creamy texture is an art. Refrigerating your mixture prior to churning allows for better emulsification of fats, leading to a smooth consistency.
Consider using high-fat dairy products; they encourage a silkier texture. Also, avoid over-churning during the ice-cream-making process—this can lead to an undesirable grainy texture.
Importance of Chilling the Mixture Before Churning
Chilling the mixture isn’t just a suggestion; it’s a fundamental step in the process. This not only helps with the incorporation of flavors but also ensures the mixture freezes more evenly in the ice cream maker.
By allowing the mixture to chill, you’ll reduce the likelihood of ice crystals forming, which can detract from the overall creaminess and enjoyment of your cookie monster ice cream.
Making the Cookie Dough
No Cookie Monster Ice Cream would be complete without the star ingredient—the cookie dough! This section will guide you through creating safe and delicious edible cookie dough to fold into your ice cream.
Simple Recipe for Edible Cookie Dough
To whip up a batch of edible cookie dough, start by creaming softened butter and brown sugar in a mixing bowl. Beat in vanilla extract until well blended. Gradually add in the all-purpose flour and mix until combined. Finally, fold in chocolate chips to complete your cookie dough.
This cookie dough is designed to be safe to eat raw, so there’s no need for eggs. This keeps the whole experience fun and worry-free, especially for kids.
Safety Tips for Using Raw Flour and Egg Alternatives
When creating your edible cookie dough, it’s essential to consider safety. Raw flour can sometimes contain harmful bacteria, so it’s advisable to heat-treat the flour before use. Simply spread it on a baking sheet and bake at a low temperature for a few minutes to kill off any potential pathogens.
Additionally, omitting eggs not only safeguards against salmonella but also lends itself to a perfectly rich cookie dough suited for this recipe.
Suggestions for Flavor Variations in the Cookie Dough
Feel free to get creative with your cookie dough! While classic chocolate chip is always a winner, consider incorporating other flavors such as peanut butter or white chocolate chips. For a seasonal twist, add pumpkin spice or peppermint extract around the holidays. The possibilities are truly endless!
Churning the Ice Cream
Now that your ice cream base and cookie dough are ready, it’s time to churn the ice cream. This step is crucial for developing the final texture of your Cookie Monster Ice Cream.
Instructions on How to Churn the Ice Cream
Once your ice cream base has been chilled, pour it into the ice cream maker. Follow the manufacturer’s instructions regarding churning times. Generally, you will want to churn until the mixture thickens and starts to resemble soft serve.
If you’re using the no-churn method, pour the mixture into a freezer-safe container and stir vigorously every hour for the first few hours to break up ice crystals.
Tips for Timing and Consistency While Churning
Timing is everything when it comes to churning. Keep an eye on the consistency; you want it to be thick yet still pourable. A good rule of thumb is to stop churning once you start seeing trails in the ice cream. Over-churning can lead to icy textures that aren’t desirable.
Importance of Not Over-Churning
Over-churning can be detrimental to your ice cream’s texture. As you churn, air is incorporated into the mixture, creating that luscious creaminess we all love. However, if you continue past the point of soft serve and into a more solid state, you risk breaking down those delicate air pockets, resulting in a less enjoyable product.
Mixing in the Cookie Dough
With your ice cream churned to perfection, it’s now time to fold in the cookie dough. This step adds that delightful chewy texture and bursts of flavor throughout each scoop.
Step-by-Step Process for Folding in Cookie Dough
After churning, transfer the soft ice cream into a mixing bowl. Take your prepared cookie dough and gently fold it into the ice cream using a spatula. Be careful not to overmix; you want to maintain those distinct cookie dough chunks rather than fully incorporate them.
Recommended Proportions for Cookie Dough to Ice Cream Ratio
For the perfect balance of flavor, aim for a ratio of approximately one cup of cookie dough to four cups of ice cream base. This ensures that every scoop has a delightful mix of ice cream and cookie dough without being overwhelming.
Method for Creating a Marbled Effect
If you’re feeling adventurous, try creating a marbled effect with your cookie dough. Instead of folding it in completely, drop spoonfuls of cookie dough into the ice cream and swirl them gently with a spatula. This technique creates beautiful ribbons of cookie dough throughout your ice cream, enhancing both the taste and visual appeal.
Freezing the Ice Cream
Following the mixing of cookie dough, the next step is to properly freeze your creation. Proper freezing is essential to achieve the perfect scoopable texture.
Guide on How to Properly Freeze the Ice Cream Mixture
Transfer your mixed ice cream into a clean, airtight container. Smooth the top with a spatula to minimize air exposure, which can lead to ice crystals. For extra protection, consider placing a piece of parchment paper directly on top of the ice cream before sealing the lid.
Recommended Time for Freezing and Storage Tips
Let your ice cream freeze for at least four hours, or preferably overnight, to ensure it firms up nicely. When stored properly, your homemade Cookie Monster Ice Cream can last in the freezer for up to two weeks, maintaining its quality.
How to Achieve the Perfect Scoopable Texture After Freezing
To ensure a scoopable texture after freezing, allow the ice cream to sit at room temperature for about 5-10 minutes before attempting to scoop. This short wait time allows the ice cream to soften slightly while retaining its structure, making it easy to serve.
Serving Suggestions
With your Cookie Monster Ice Cream ready to enjoy, it’s time to get creative with serving suggestions. Presentation can elevate the experience, making it even more enjoyable.
Creative Ways to Serve Cookie Monster Ice Cream
Consider serving your ice cream in colorful bowls or cones to amplify the fun. You could create an ice cream sundae bar, complete with various toppings like crushed cookies, whipped cream, and sprinkles, allowing everyone to customize their treat.
Pairing Ideas with Other Desserts or Toppings
Pairing your Cookie Monster Ice Cream with warm desserts like brownies or chocolate cake creates a delightful contrast in temperature and texture. Alternatively, serve it alongside fresh fruit for a refreshing balance.
Fun Presentation Ideas for Parties or Special Occasions
For special events, consider building an ice cream sandwich station where guests can layer their Cookie Monster Ice Cream between two cookies of their choice. This interactive approach builds excitement and gives everyone the chance to unleash their creativity.
Variations on the Classic Recipe
While the classic Cookie Monster Ice Cream is irresistible, experimentation opens doors to exciting variations. Here are some ideas to inspire your next creation.
Ideas for Different Flavors or Mix-Ins
Play with flavors by adding crushed Oreos, caramel swirls, or even peanut butter chunks into the mix. Swap out chocolate chips for seasonal options like candy corn in the fall or peppermint candies during the winter holidays.
Dairy-Free or Vegan Adaptations of the Recipe
For those following a dairy-free lifestyle, substitute the cream and milk with coconut milk or almond milk and use vegan chocolate chips.
This alternative ensures you don’t miss out on creating delicious Cookie Monster Ice Cream while accommodating dietary needs.
Seasonal Variations
Embrace seasonal flavors to keep things interesting! In the summer, consider adding fresh fruits like strawberries or mangoes for a tropical twist. During the winter, incorporate gingerbread or peppermint flavors for a festive touch.
Frequently Asked Questions
As with any recipe, questions may arise during preparation and storage. This section addresses common queries, ensuring you feel confident while creating your Cookie Monster Ice Cream.
Common Queries Regarding Preparation and Storage
Many people wonder about the best ways to store homemade ice cream. Keeping it in an airtight container is crucial to prevent freezer burn and maintain its creaminess.
Troubleshooting Tips for Common Issues
If your ice cream turns out too hard, it could be due to over-churning or insufficient chilling. A quick solution involves letting it sit at room temperature for a few minutes before scooping. Likewise, if you encounter ice crystals, ensure proper mixing and storage techniques.
Clarifications About Ingredient Substitutions
Feel free to swap ingredients based on your preferences or dietary restrictions. For example, replace granulated sugar with coconut sugar for a unique flavor profile, or use gluten-free flour in the cookie dough for a gluten-free option.
Conclusion
Crafting your very own Cookie Monster Ice Cream is a delightful journey filled with creativity, flavor, and joy. From the vibrant blue hue to the chewy cookie dough, every aspect of this recipe offers a whimsical experience. As you indulge in this sweet treat, whether alone or shared with loved ones, you’re sure to create cherished memories.
So roll up your sleeves, gather your ingredients, and embark on the adventure of making the ultimate Cookie Monster Ice Cream Recipe—a dessert that promises not only satisfaction but also a sprinkle of nostalgia and joy with every scoop.
Looking for the perfect frosting? Try our Julia Child Buttercream Recipe, and while you’re at it, check out our festive Christmas Monster Cookies for a delightful holiday treat!
Print
Delicious Cookie Monster Ice Cream Recipe: A Fun Twist on Classic Dessert
- Total Time: 1.5-2 hours
- Yield: 4 servings 1x
Description
Cookie Monster Ice Cream is a fun, indulgent treat that combines the delicious flavors of chocolate chip cookies with rich, creamy ice cream. With its vibrant blue color and crunchy cookie mix-ins, this ice cream is sure to delight both kids and adults. Perfect for any occasion, it’s easy to make and a guaranteed hit at your next gathering.
Ingredients
- 2 cups heavy cream
- 1 cup whole milk
- 1/2 cup granulated sugar
- 1 teaspoon vanilla extract
- 1/2 cup mini chocolate chips
- 1/2 cup crumbled chocolate chip cookies (preferably Oreo or your favorite type)
- 1–2 tablespoons blue food coloring (optional for the “Cookie Monster” look)
Instructions
- 2 cups heavy cream
- 1 cup whole milk
- 1/2 cup granulated sugar
- 1 teaspoon vanilla extract
- 1/2 cup mini chocolate chips
- 1/2 cup crumbled chocolate chip cookies (preferably Oreo or your favorite type)
- 1-2 tablespoons blue food coloring (optional for the “Cookie Monster” look)
Notes
- For a fun twist, try using different types of cookies or add-ins such as cookie dough, brownie bits, or sprinkles.
- If you don’t have an ice cream maker, you can also make this ice cream by mixing the base ingredients, placing it in a container, and stirring every 30 minutes for 3-4 hours until it reaches a smooth consistency.
- This ice cream is best consumed within 1-2 weeks for optimal freshness.
Enjoy your creamy and fun Cookie Monster Ice Cream!
- Prep Time: 10 minutes
- Cook Time: 25-30 minutes (churning)
- Category: Dessert
- Method: Ice Cream Maker, Freezing
- Cuisine: American
Nutrition
- Serving Size: 1/4 of the recipe
- Calories: 300
- Sugar: 22g
- Sodium: 40mg
- Fat: 18g
- Saturated Fat: 10g
- Unsaturated Fat: 5g
- Trans Fat: 0g
- Carbohydrates: 34g
- Fiber: 1g
- Protein: 3g
- Cholesterol: 55mg
Keywords: Cookie Monster Ice Cream, Homemade Ice Cream Recipe, Fun Ice Cream Recipe, Chocolate Chip Cookie Ice Cream, Cookie Ice Cream, DIY Ice Cream